
Professional pipe camera systems represent significant investments for plumbing contractors, facility managers, and inspection professionals. Proper maintenance of these sophisticated diagnostic tools directly impacts their performance, reliability, and operational lifespan. Understanding essential care protocols ensures your pipe camera delivers consistent inspection results while minimizing costly repairs and unexpected downtime.
Effective pipe camera maintenance encompasses multiple critical areas including cable management, lens protection, monitor care, and proper storage procedures. Each component requires specific attention to maintain optimal functionality and prevent premature deterioration. Implementing comprehensive maintenance practices protects your equipment investment and ensures reliable performance during critical inspection operations.
Pre-Inspection Preparation and System Checks
Visual Component Assessment
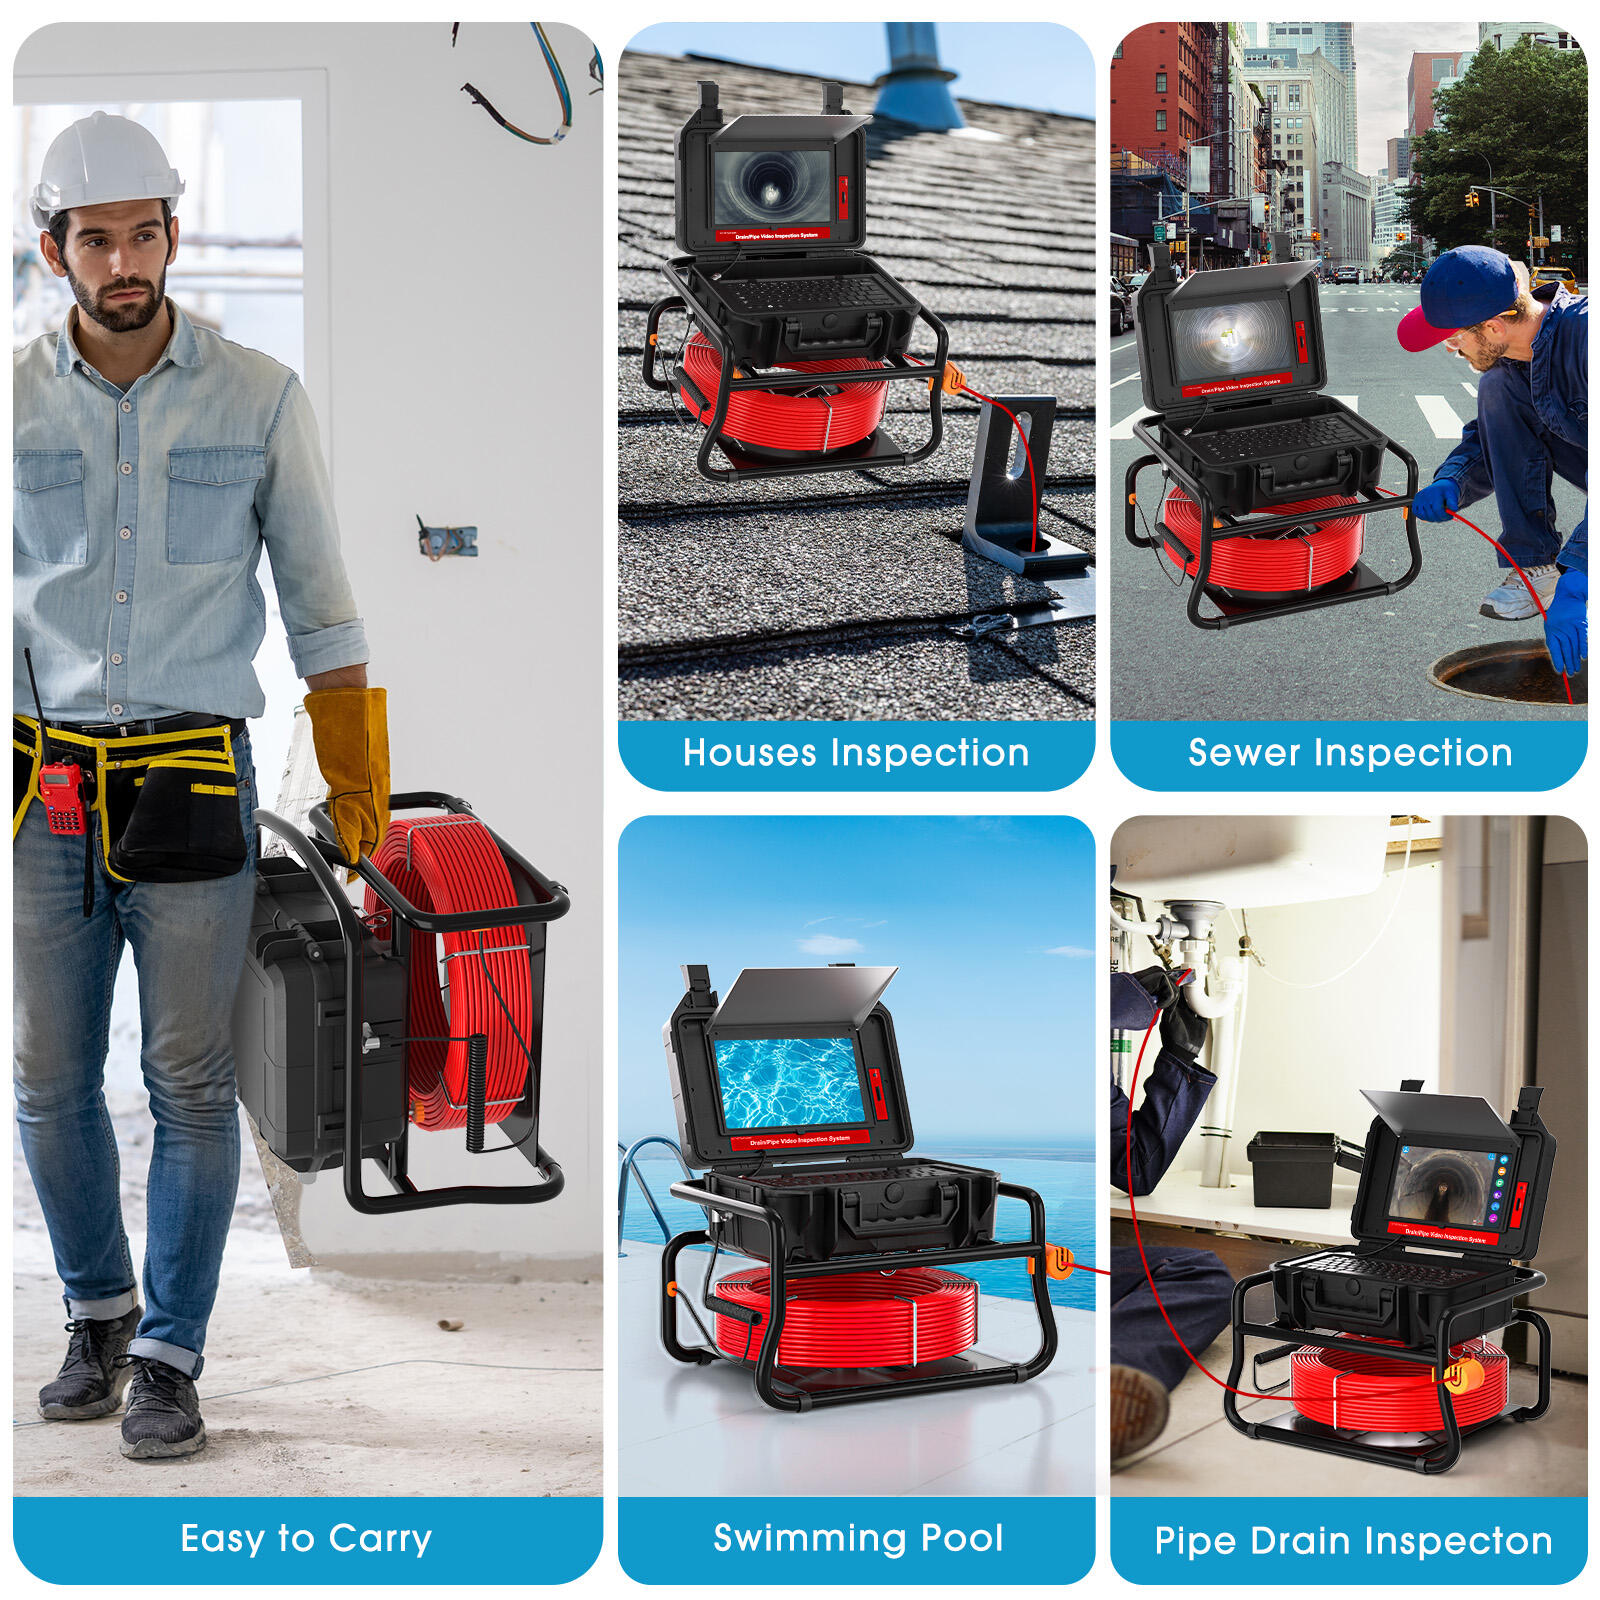
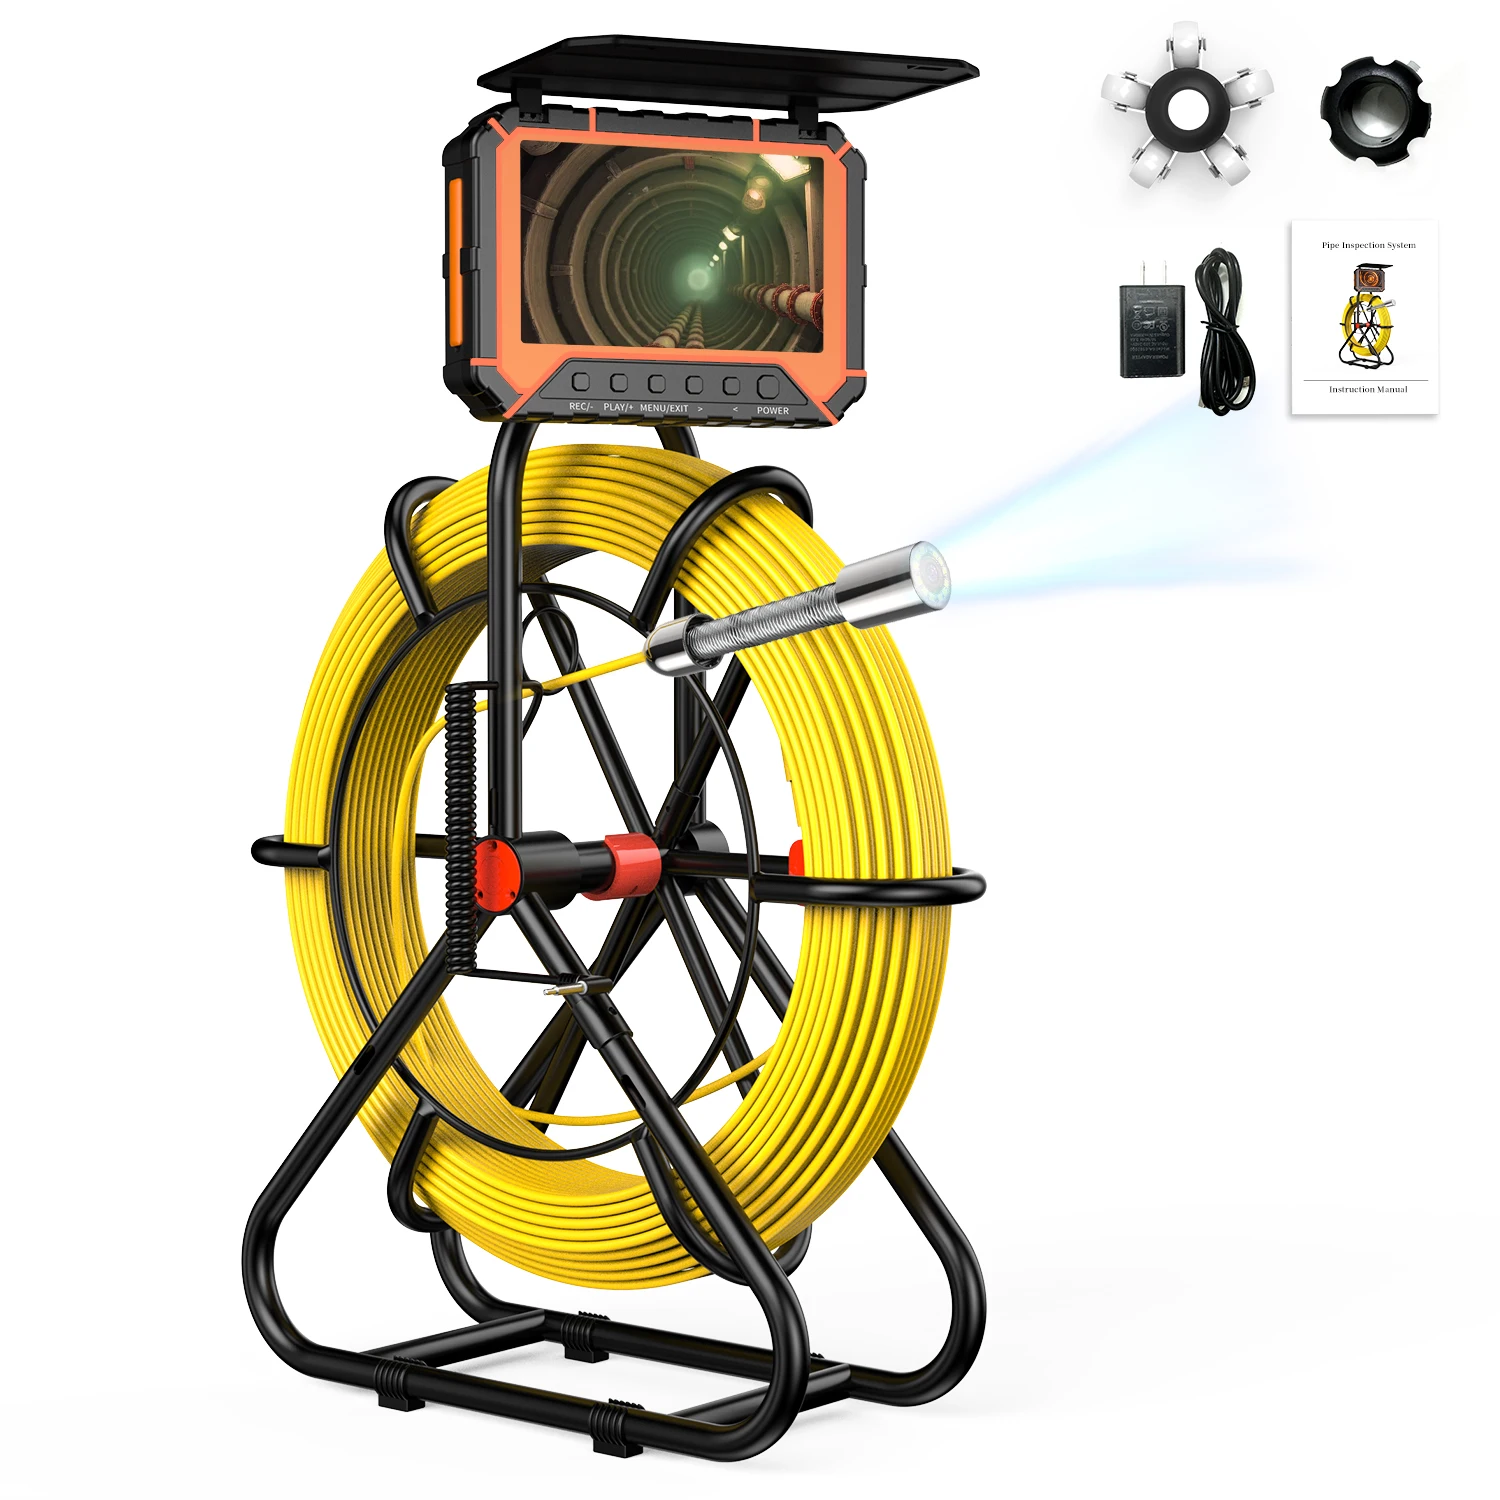
Every pipe camera inspection begins with thorough visual examination of all system components. Inspect the camera head for physical damage, lens clarity, and LED functionality before deployment. Check the flexible cable for cuts, kinks, or worn sections that could compromise performance or cause failure during operation. Examine connection points between the camera head and cable for secure attachment and proper sealing.
Monitor screen inspection involves checking for display clarity, color accuracy, and proper brightness levels. Verify that all control buttons respond correctly and menu functions operate smoothly. Test battery charge levels and ensure backup power sources are readily available for extended inspection sessions. Document any observed issues to track equipment condition over time.
Cable Length and Flexibility Testing
Cable flexibility directly affects pipe camera maneuverability within drainage systems. Perform gentle flexibility tests by carefully coiling and uncoiling the cable to identify stiff sections or damaged areas. Measure actual usable cable length against manufacturer specifications to ensure accurate distance readings during inspections. Replace distance markers or counters that show signs of wear or inaccuracy.
Inspect cable sheathing for chemical damage from exposure to harsh drain environments. Look for discoloration, cracking, or softening that indicates material degradation. Test electrical continuity between the camera head and control unit to verify signal transmission integrity. Address any connectivity issues before deploying the pipe camera for actual inspection work.
Post-Inspection Cleaning and Decontamination
Immediate Cleaning Protocols
Proper post-inspection cleaning begins immediately after removing the pipe camera from the drainage system. Rinse the entire cable length with clean water to remove debris, grease, and contaminants before they can adhere to the cable surface. Pay special attention to the camera head and lens assembly, using gentle water pressure to dislodge accumulated material without damaging sensitive components.
Use appropriate cleaning solutions designed for pipe camera equipment to neutralize chemical residues and biological contaminants. Avoid harsh chemicals or abrasive cleaners that could damage cable sheathing or compromise waterproof seals. Allow sufficient contact time for cleaning agents to effectively break down stubborn deposits while following manufacturer recommendations for safe chemical exposure limits.
Disinfection and Sanitization Procedures
Effective disinfection prevents cross-contamination between different inspection sites and protects operator health. Apply EPA-approved disinfectants specifically formulated for pipe camera equipment after initial cleaning. Ensure complete coverage of all surfaces that contacted contaminated environments during the inspection process.
Rinse thoroughly with clean water after disinfection to remove chemical residues that could cause long-term damage to equipment components. Dry all surfaces completely using lint-free cloths or compressed air to prevent moisture-related corrosion or electrical issues. Document cleaning and disinfection procedures for quality control and regulatory compliance purposes.
Storage and Environmental Protection
Proper Storage Conditions
Optimal storage conditions significantly extend pipe camera service life and maintain performance reliability. Store equipment in climate-controlled environments with stable temperature and humidity levels to prevent condensation and thermal stress on electronic components. Avoid extreme temperature fluctuations that can cause expansion and contraction damage to sensitive parts.
Coil cables loosely using manufacturer-recommended techniques to prevent permanent kinks or stress concentrations. Support cable weight properly during storage to avoid stretching or deformation. Protect the camera head and lens from impact damage using padded cases or protective covers specifically designed for pipe camera equipment.
Long-Term Storage Considerations
Extended storage periods require additional protective measures to maintain pipe camera readiness. Remove batteries from portable units to prevent leakage and corrosion damage during inactive periods. Apply appropriate corrosion inhibitors to metal components following manufacturer specifications and safety guidelines.
Perform periodic inspection cycles during storage to identify developing issues before they become major problems. Test system functionality monthly during extended storage periods to ensure immediate operational readiness when needed. Maintain detailed service records documenting storage conditions and periodic testing results.
Component-Specific Maintenance Requirements
Camera Head and Lens Care
The camera head represents the most critical and vulnerable component of any pipe camera system. Protect the lens from scratches and impact damage using appropriate covers when not in active use. Clean lens surfaces using only recommended materials and techniques to maintain optical clarity and image quality.
Monitor LED light output regularly to identify declining illumination that could affect inspection quality. Replace LED arrays according to manufacturer schedules or when output drops below acceptable levels. Check waterproof seals around the camera head for integrity and replace gaskets showing signs of deterioration or damage.
Cable Management and Protection
Proper cable management prevents the most common pipe camera failures and extends equipment lifespan significantly. Avoid sharp bends or kinks that can damage internal wiring or compromise cable flexibility. Use appropriate cable guides and supports during deployment to minimize stress on connection points and vulnerable sections.
Implement cable marking systems to track wear patterns and identify sections requiring closer monitoring or preventive replacement. Rotate cable usage patterns when possible to distribute wear evenly across the entire length. Replace worn sections before complete failure to avoid costly emergency repairs and inspection delays.
Troubleshooting and Preventive Maintenance
Common Issue Identification
Early identification of developing problems allows for proactive maintenance and prevents minor issues from becoming major failures. Monitor image quality consistently for gradual degradation that might indicate lens contamination, LED failure, or cable signal loss. Address connectivity issues immediately to prevent intermittent failures during critical inspections.
Track battery performance metrics including charge capacity, discharge rates, and charging cycle efficiency. Document recurring issues to identify patterns that might indicate systemic problems requiring professional service or component replacement. Maintain comprehensive maintenance logs for warranty compliance and equipment history tracking.
Professional Service Requirements
Certain pipe camera maintenance tasks require professional service capabilities and specialized equipment. Schedule annual comprehensive inspections with qualified service technicians to verify waterproof integrity, electrical safety, and overall system performance. Replace critical components according to manufacturer recommendations rather than waiting for failure.
Calibrate distance measurement systems regularly to ensure accurate documentation during inspections. Update software and firmware as recommended by manufacturers to maintain compatibility and access new features. Invest in proper training for maintenance personnel to ensure correct procedures and avoid damage during routine care activities.
FAQ
How often should I clean my pipe camera after use?
Clean your pipe camera immediately after every use to prevent contamination buildup and material adhesion. Perform basic cleaning with water rinse and appropriate cleaning solutions, followed by thorough drying before storage. More intensive cleaning may be required after inspections in particularly contaminated environments or when switching between different types of drainage systems.
What are the signs that my pipe camera needs professional service?
Key indicators include declining image quality, intermittent electrical connections, visible cable damage, or waterproof seal compromise. Reduced battery life, inconsistent LED performance, or difficulty with cable deployment also signal the need for professional attention. Address these issues promptly to prevent more extensive damage and costly repairs.
Can I use household cleaners on my pipe camera equipment?
Avoid household cleaners as they may contain chemicals that damage cable materials, compromise waterproof seals, or leave residues that affect equipment performance. Use only manufacturer-recommended cleaning products designed specifically for pipe camera equipment. When in doubt, consult your equipment manual or contact technical support for appropriate cleaning product recommendations.
How should I store my pipe camera during winter months?
Store your pipe camera in a heated, climate-controlled environment to prevent freezing damage and condensation issues. Remove batteries during extended storage periods and ensure all components are completely dry before storage. Perform monthly functionality checks during inactive periods and follow manufacturer guidelines for long-term storage procedures to maintain equipment readiness.